Sagging sofa repair:Brussels and whole Belgium


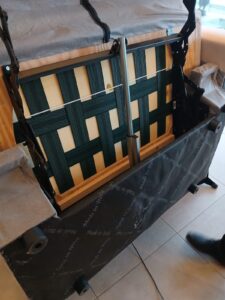
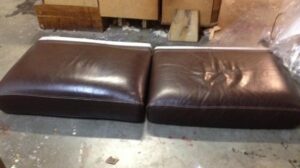

Table of Contents
- Introduction: Understanding the “Sagging Sofa” Dilemma
- Why Do Sofas Sag? Common Causes and Warning Signs
- Initial Assessment: Determining the Severity of Sagging
- Sagging Sofa Repair: Is DIY an Option or Should You Hire a Pro?
- Essential Tools and Materials for Sofa Repair
- Step-by-Step: How to Repair a Sagging Sofa Frame
- Repairing Springs and Webbing
- Foam, Cushions, and Padding Issues
- Fixing a Sagging Sofa with Simple DIY Hacks
- Reinforcing the Sofa Base or Deck
- Reupholstering a Sagging Sofa: An Overview
- Cost Analysis: What to Expect
- Professional Sofa Repair Services
- Preventing Future Sagging: Maintenance and Care
- Sagging Sofa Repair: Eco-Friendly and Sustainable Approaches
- Case Studies: Real-Life Examples of Sagging Sofa Repairs
- Frequently Asked Questions (FAQ)
- When to Replace vs. When to Repair
- Trends and Innovations in Sofa Repair
- Conclusion
1. Introduction: Understanding the “Sagging Sofa” Dilemma
A sagging sofa is more than a mere eyesore. It can disrupt your living room’s aesthetic, affect seating comfort, and potentially lead to back or neck pain for those who spend long hours on it. Sofas sag for various reasons—worn-out cushions, weak or broken frames, fatigued springs, or subpar manufacturing. Regardless of the cause, the good news is that a sagging sofa is often fixable. repairing a sagging couch with non-removable cushions is also possible
In this comprehensive guide, we’ll walk you through everything you need to know about sagging sofa repair. From identifying the root causes of sagging to performing a do-it-yourself cushion refill or tackling frame reinforcement, you’ll gain the practical knowledge to make an informed decision. Should you try a DIY approach, or is it time to call a professional? We’ll explore that too, along with cost estimates, eco-friendly solutions, and maintenance tips to keep your sofa in prime condition for years to come.
Whether you’re a homeowner dealing with a family-friendly couch that’s endured one too many movie nights or a design enthusiast eager to revive a vintage piece, we have the step-by-step advice you need. Let’s dive in and rescue that sagging sofa from the brink of replacement.
Fix sagging sofa with plywood, foam, support board or dunelm in the middle or inside. u can also learn How to fix sagging couch cushions
2. Why Do Sofas Sag? Common Causes and Warning Signs
Before you decide on a repair strategy, you need to identify why your sofa is sagging. Not all sagging results from the same issues; different causes demand different solutions. Let’s break down some of the most common culprits:
2.1 Weak or Broken Frame
- Material Quality: Sofas made from softwoods or particleboard may not withstand long-term use.
- Joinery Issues: Poorly fastened joints or nails instead of screws can lead to structural weakness.
- Age and Wear: Over time, even high-quality frames can become loose at critical stress points.
Warning Sign: If you hear creaking or notice visible cracks in the wood, you likely have a frame problem.
2.2 Damaged Springs and Webbing
- Coil Springs: Traditional high-end sofas use coiled springs, but these can lose tension or break.
- Sinuous Springs: S-shaped metal wires that can snap or come loose from the frame.
- Webbing: Strips of woven fabric or rubber under the cushions. Over time, they stretch out or tear.
Warning Sign: You sit down and experience sudden dips in particular areas, or you hear metal squeaks.
2.3 Degraded Foam and Cushioning
- Polyurethane Foam: Tends to lose shape with regular use, leading to sagging seat cushions.
- Down or Feather Fill: May clump and flatten if not regularly fluffed or if poorly maintained.
- Low-Density Foam: Wears out faster than high-resilience foam, leading to early sagging.
Warning Sign: Cushions appear deflated or feel lumpy, especially around high-traffic spots like corners or the center of the sofa.
2.4 Cheap Manufacturing
- Budget Sofas: Often assembled with low-quality wood, minimal webbing or springs, and poor foam.
- Fast Furniture: May look good initially but is not designed for longevity.
Warning Sign: Sagging occurs within months or a couple of years of purchase, rather than over a long stretch of time.
2.5 Heavy or Continuous Use
- High Traffic: Sofas used daily, especially in large families or communal spaces, undergo greater stress.
- Overloading: Consistently seating more people than it’s designed for or placing heavy objects can accelerate wear.
Warning Sign: Distinct “sag zones” in areas where certain individuals regularly sit.
3. Initial Assessment: Determining the Severity of Sagging
Before beginning a sagging sofa repair, it’s crucial to evaluate how extensive the damage is. A thorough assessment helps you decide if a simple DIY fix will suffice, or if a more extensive repair is in order.
3.1 Visual Inspection
- Remove Cushions: Look for sagging in the deck (the platform beneath the cushions).
- Examine the Frame: Check for cracks, splits, or loose joints.
- Inspect Springs or Webbing: Use a flashlight to spot sagging, detached, or rusty springs.
3.2 Sit Test
- Evenness: Sit in various spots and note if the seat collapses more in one area.
- Support: Pay attention to how much you sink in. Proper support shouldn’t feel like you’re sitting in a hole.
- Noises: Listen for squeaks, groans, or snapping sounds.
3.3 Cushions Check
- Density: Press down on each cushion. Does it bounce back, or remain sunken?
- Shape: Look for lumps, flattened corners, or uneven distribution of filling.
3.4 Weight Distribution
- Lift the Sofa: If it’s noticeably lighter at one side, that side might have lost more structural integrity or cushion filling.
- Flip it Upside Down: If possible, remove the dust cover on the underside to inspect the structure thoroughly.
Outcome: If only the cushions are sagging but the frame seems robust, you can focus on foam replacement or re-stuffing. If the frame or springs are damaged, you’ll need a more involved approach.
4. Sagging Sofa Repair: Is DIY an Option or Should You Hire a Pro?
Repairing a sagging sofa can be anything from a simple afternoon DIY job to a complex project requiring specialized tools and expertise. Here are factors to consider when deciding between doing it yourself and hiring a professional:
4.1 DIY Advantages
- Cost Savings: Avoid labor fees and markups on materials.
- Skill Development: Gain hands-on experience with furniture repair.
- Customization: Choose the exact foam density or type of webbing you want.
4.2 DIY Challenges
- Time-Consuming: Diagnosing and fixing a serious sag can take hours or days.
- Tool Requirements: Might need staple guns, hammers, special adhesives, or saws.
- Risk of Errors: Inexperience can lead to further damage.
4.3 Professional Repair Services
- Expert Assessment: Pros can pinpoint deeper issues quickly.
- High-Quality Work: Skilled repairers have the tools and know-how for a seamless fix.
- Warranty: Some shops offer guarantees on labor and materials.
4.4 When to Absolutely Hire a Professional
- Cracked or severely damaged frame that may need partial reconstruction or specialized joinery.
- Exotic fabrics or valuable antique sofas, where you risk devaluing the piece with amateur attempts.
- Complex internal structures, like recliners or sleeper sofas.
Pro Tip: For minor cushion sagging or a slightly stretched webbing, a confident DIY approach is often sufficient. But if you find structural or mechanical complexities, consulting a professional can save you both time and frustration.
5. Essential Tools and Materials for Sofa Repair
Whether you’re tackling the job yourself or just want to understand what’s involved, below is a list of must-have tools and materials for a typical sagging sofa repair project.
5.1 Basic Hand Tools
- Screwdrivers (Flathead and Phillips): For removing screws in the frame or dust cover.
- Staple Remover: To detach staples from upholstery.
- Pliers: For pulling out old staples or nails.
- Hammer: Helpful for frame adjustments or tapping in new nails.
- Measuring Tape: Useful for cutting foam and webbing to the right dimensions.
- Utility Knife: To cut foam or fabric.
5.2 Power Tools (Optional but Useful)
- Staple Gun (Electric or Pneumatic): Reupholstering or replacing webbing requires re-stapling.
- Drill: For adding or removing screws in wooden frames.
- Jigsaw: If you need to replace or cut new wood sections for the deck.
5.3 Materials
- Foam: Choose the right density; high-density polyurethane or HR (high resilience) foam is ideal for seat cushions.
- Batting or Fiberfill: To wrap foam or refill cushion backs for a plush feel.
- Webbing or Sinuous Springs: Replacement if your old support system is worn.
- Wood: If the frame needs reinforcement or partial replacement. Typically plywood or hardwood.
- Upholstery Staples: Usually 1/4-inch to 3/8-inch staples for attaching fabrics and webbing.
- Glue or Adhesive: For minor fixes or to secure foam layers.
- Replacement Screws or Nails: For frame reinforcements or for reattaching hardware.
5.4 Safety Equipment
- Gloves: Protect your hands from splinters, sharp edges, and staple pricks.
- Eye Protection: If using power tools or working with staples near your face.
- Dust Mask: Especially if old foam is disintegrating or you’re dealing with wood dust.
Pro Tip: Invest in quality foam rather than the cheapest option. Low-quality foam will likely sag again in a relatively short time.
6. Step-by-Step: How to Repair a Sagging Sofa Frame
A frame is literally the backbone of your sofa. If the frame has lost its integrity, no amount of cushion padding will solve the underlying sag.
6.1 Identifying Frame Damage
- Look for Cracks in the Wood: Use a flashlight to see if the wood is split at joints or corners.
- Test Stability: Wiggle the sofa’s arms and back. Excessive movement indicates loosened joints.
- Check Beneath the Deck: Sometimes you’ll see popped staples or missing screws that hold the deck to the frame.
6.2 Tools for Frame Repair
- Wood Glue: For sealing cracks and re-gluing separated joints.
- Screws: Self-tapping wood screws that are long enough to grip firmly.
- Metal Brackets or Corner Braces: For added reinforcement if joints are weak.
6.3 Disassembly (If Needed)
- Remove Seat Cushions: Gain access to the deck and inside the sofa.
- Flip the Sofa: Carefully place it upside down, unscrew the dust cover if present, and remove any obstructions.
6.4 Fixing the Joint or Crack
- Apply Wood Glue: Squeeze it into the crack or separated joint.
- Clamp the Wood: Use bar clamps or C-clamps to hold the pieces firmly together while the glue dries.
- Add Screws or Brackets: Once the glue is set, reinforce the joint with screws or L-brackets. Ensure you pre-drill holes to avoid splitting the wood.
6.5 Reattaching the Deck (If Loose)
- Use Strong Screws: Drive them through the deck into the frame rails.
- Check for Level: Ensure the deck sits flat; a crooked deck means uneven distribution of weight.
6.6 Final Check
- Sturdiness: Give the frame a good shake; it should feel solid.
- No Visible Cracks: Inspect your work for missed splits or gaps.
- Reattach Dust Cover: Staple it back neatly.
Pro Tip: For frames beyond simple repair—like those with extensive dry rot or multiple broken supports—you may need partial frame reconstruction or professional assistance.
7. Repairing Springs and Webbing
Even with a sturdy frame, sagging can occur if the spring system or webbing underneath the cushions has degraded.
7.1 Types of Sofa Springs
- Sinuous (Zigzag) Springs: Common in modern sofas; shaped like a continuous “S.”
- Coil (Eight-Way Hand-Tied): Found in higher-end or traditional sofas.
- Pocket Springs: Individual coils wrapped in fabric, more typical in mattresses but sometimes used in seat cushions.
7.2 Common Spring Issues
- Broken Springs: Snap or lose tension.
- Detached Clips: Springs come loose from the clips that attach them to the frame.
- Rust: Corrodes metal, reducing tensile strength.
7.3 Replacing or Tightening Springs
- Identify Damaged Springs: Remove dust cover and check each spring for cracks or severe bending.
- Purchase Matching Springs: The replacement must match coil or sinus shape, gauge, and length.
- Use Proper Clips or Fasteners: Attach new springs securely to the frame.
- Tensioning: For coil springs, you might need to retie them with twine, ensuring consistent tension across all springs.
7.4 Webbing Replacement
- Webbing Materials: Jute webbing (traditional) or synthetic elastic webbing (modern).
- Removal: Pry out old staples or tacks.
- Installation: Stretch new webbing across the seat deck or back, staple firmly. Usually done in a crisscross pattern for even support.
Pro Tip: When installing new springs or webbing, always maintain consistent tension to avoid a lopsided feel.
8. Foam, Cushions, and Padding Issues
A large majority of “saggy sofa” complaints stem from deteriorated foam or insufficient padding.
8.1 Types of Foam
- Polyurethane Foam: Affordable, but can flatten relatively fast.
- High-Density Foam: More durable and supportive.
- High-Resilience (HR) Foam: Premium option with excellent bounce-back.
8.2 Step-by-Step Cushion Foam Replacement
- Remove the Old Foam: Unzip cushion covers if possible. If the cushion is permanently sewn, you may need to open a seam.
- Measure and Cut New Foam: Use the old piece as a template or measure precisely. An electric knife or foam cutter works best.
- Wrap Foam in Batting: Add a layer of polyester batting around the foam for a softer, rounded edge.
- Insert Foam Back: Ensure it fits snugly into the cushion cover.
- Close and Fluff: If covers are zippered, just zip them. For sewn covers, restitch the seam.
8.3 Feather or Down-Filled Cushions
- Refluffing: You can sometimes “refresh” these cushions by vigorously shaking and redistributing feathers.
- Top-Up Fill: Purchase matching down or feather fill to replenish lost volume.
- Allergies: Consider whether synthetic alternatives are better for dust-allergy-prone households.
8.4 Hybrid Cushions
Many sofas combine foam cores with a feather or fiber wrap. This approach balances structure with softness. If your sofa is designed like this, you might only replace the foam core or the wrap, depending on which component has degraded.
9. Fixing a Sagging Sofa with Simple DIY Hacks
For those not ready for a full disassembly, here are some “quick fix” methods that address minor sagging:
9.1 Under-Cushion Support Board
- Plywood or Particle Board: Cut a board slightly smaller than the cushion footprint and place it under the seat.
- Pros: Immediate improvement in seat firmness.
- Cons: May reduce comfort if overdone.
9.2 Adding Additional Cushion Support
- Foam Inserts: Tuck smaller foam wedges or pads beneath or behind existing cushions.
- Stuffer Pillows: Place them in areas that need extra lift, particularly corners.
9.3 Webbing or Strapping Kits
- Temporary Reinforcement: Some kits let you loop straps under the cushions to add tension.
- Easy Install: Typically just wrap around the frame.
- Short-Term Fix: May not be as durable as replacing internal webbing or springs.
9.4 Flip and Rotate Cushions
- Distribution of Wear: Periodically rotating cushions extends their life and helps them wear evenly.
- Flipping: If double-sided cushions exist, flipping them can restore a fresher sitting surface.
Pro Tip: While hacks can provide short-term relief, they’re not a substitute for a thorough repair if the sofa’s internal structure is compromised.
10. Reinforcing the Sofa Base or Deck
Even if the frame is intact and the springs are fine, the deck underneath can become weak over time—especially if made of thin plywood or partial board.
10.1 Identifying Base Weakness
- Excessive Bowing: When you press the deck from underneath, it bends easily.
- Loose Staples: The deck might have pulled away from frame rails.
- Cracks: Visible lines in the wood indicate fracturing.
10.2 Reinforcement Options
- Add Plywood: Cut a new piece to fit snugly over or replace the old deck. Screw it into the frame rails.
- Install Additional Support Beams: Horizontal or cross beams inside the base to distribute weight.
- Metal L-Brackets: For corners where the deck meets the frame for better stability.
10.3 Finishing Up
- Check Clearance: Ensure you’re not blocking springs or mechanical parts.
- Replace Dust Cover: Use staples to reattach it.
- Test by Sitting: The seat should feel noticeably more supportive.
Pro Tip: Choose 1/2-inch or thicker plywood to avoid a “too-stiff” result. Thinner boards (e.g., 1/4-inch) can bend and fail again quickly.
11. Reupholstering a Sagging Sofa: An Overview
Sometimes the best fix is not just about the internal structure but also giving the sofa a fresh look. Reupholstery typically includes repairing sagging issues, replacing foam, and refreshing the outer fabric or leather.
11.1 Pros of Reupholstery
- Complete Makeover: Transform the sofa’s style, color, and texture.
- Customized Foam: Choose higher-density foam to prevent future sagging.
- Sustainable: Extends the sofa’s life instead of discarding it.
11.2 Cons of Reupholstery
- Cost: High-quality fabrics or leathers and skilled labor can be expensive.
- Time: The process may take weeks, especially if the upholsterer has a backlog.
- Complex: If the sofa’s frame is severely damaged, reupholstery alone won’t fix structural issues without additional repairs.
Pro Tip: If your budget allows, reupholstery can effectively transform a well-built but sagging sofa into a brand-new piece. Always confirm the frame condition first.
12. Cost Analysis: What to Expect
The cost of fixing a sagging sofa varies widely depending on factors like the extent of damage, type of materials, labor rates, and whether you hire professional help.
12.1 Breakdown of Potential Costs
- DIY Materials:
- Foam Replacement: $30–$100 per cushion (high-density foam).
- Springs/Webbing: $20–$50 for kits.
- Wood for Reinforcement: $10–$50 for plywood or lumber.
- Professional Services:
- Hourly Rates: $50–$100 or more, depending on region and complexity.
- New Foam Installation (Pro Labor): $30–$80 per cushion.
- Frame Repair: $100–$300 for partial repairs.
- Reupholstery: $500–$1,500 or more for a standard 3-seat sofa (labor + fabric).
12.2 Is It Worth It?
- DIY: If you’re comfortable with basic carpentry or sewing, the cost can be under $100–$200 for smaller fixes.
- Professional: Might total a few hundred dollars. Still cheaper than a new mid-range sofa, which can easily cost $700–$1,500.
- High-End Sofas: On premium pieces worth $2,000+, it usually pays off to invest in professional repairs rather than replacement.
Pro Tip: Always request quotes from at least two or three upholstery/repair shops. Ask for itemized estimates so you see the breakdown of labor, materials, and any extra fees.
13. Professional Sofa Repair Services
Sometimes, the complexity of the sagging issue or the value of your sofa makes hiring a professional worthwhile. Here’s what to look for:
13.1 Credentials and Experience
- Certified Upholsterers or Craftsmen: Check for training or membership in upholstery associations.
- Portfolio: Ask for before-and-after photos to gauge their work quality.
- Customer Reviews: Look for references or online reviews.
13.2 Services Offered
- In-Home Assessment: Some pros come to your location for a quick check.
- Pickup and Delivery: They may transport your sofa to a workshop if extensive repairs are needed.
- Warranty: Reputable repair services often offer warranties on labor and materials.
13.3 Communication is Key
- Discuss Your Priorities: E.g., do you want extra-firm cushions or a plush seat?
- Budget: Let them know your budget constraints to guide their material choices.
- Timeline: Repairs can take anywhere from a day to several weeks, so clarify expectations.
14. Preventing Future Sagging: Maintenance and Care
Once you’ve gone through the effort of sagging sofa repair, you’ll want to keep your sofa in top shape. Good maintenance helps ward off a relapse.
14.1 Regular Cushion Fluffing and Rotation
- Fluff Daily or Weekly: Particularly if cushions have foam-wrapped down or fiberfill.
- Rotate Positions: If you can flip cushions or swap them around, do so regularly to avoid localized wear.
14.2 Avoid Overloading
- Max Seating: Respect the recommended number of people or weight limit for your sofa.
- Gentle Use: Discourage kids from jumping on the sofa, as this can stress springs and frames.
14.3 Proper Cleaning
- Vacuum: Remove debris that can abrade fabric or accumulate in corners.
- Spot Cleaning: Attend to spills promptly.
- Professional Cleaning: Periodic deep cleaning helps maintain fabric integrity.
14.4 Environmental Factors
- Sunlight: Excessive UV exposure can degrade fabric and foam. Use blinds or curtains if near a window.
- Humidity: Extremely humid or dry conditions can affect wooden frames. Try to keep a balanced indoor environment.
15. Sagging Sofa Repair: Eco-Friendly and Sustainable Approaches
An increasing number of homeowners want to reduce waste by repairing rather than tossing out a sofa.
15.1 Sustainable Materials
- Natural Latex Foam: An eco-friendly substitute for petroleum-based foam.
- Recycled Polyester Batting: Minimizes carbon footprint.
- Reclaimed Wood: If new deck boards or bracing are needed, reclaimed lumber is a green choice.
15.2 Benefits of Repairing Over Replacing
- Landfill Reduction: Sofas are large items that take up significant landfill space.
- Resource Conservation: Manufacturing new furniture consumes raw materials and energy.
- Cost Savings: Typically cheaper than buying a brand-new sofa.
15.3 Donating or Reselling
- Upgrade and Sell: If you decide you no longer want the sofa, a well-repaired sofa can fetch a better resale value.
- Charities: Some organizations accept gently used furniture, but ensure it’s sturdy and clean.
16. Case Studies: Real-Life Examples of Sagging Sofa Repairs
To illustrate the variety of solutions, here are some realistic case studies:
16.1 Case Study A: Simple Foam Replacement
- Situation: A 5-year-old sofa with cushions feeling squishy and compressed. Frame was in good shape.
- Action: The owner replaced seat foam with a higher-density 2.5 lb/ft³ foam, added a layer of dacron wrap.
- Cost: About $80 in materials, 3 hours of DIY labor.
- Result: Significantly improved seat support, extending the sofa’s life by another few years.
16.2 Case Study B: Broken Frame and Worn Springs
- Situation: A 10-year-old sofa, heavily used, with a cracked side rail and sagging seat.
- Action: A professional repair shop replaced the rail, retied coil springs, and installed a new layer of webbing.
- Cost: $350 including labor.
- Outcome: The sofa felt almost new. The homeowner chose not to reupholster as the fabric was still decent.
16.3 Case Study C: Full Reupholstery and Reconstruction
- Situation: A vintage, high-end sofa inherited from a grandparent, structurally intact but cushions and upholstery severely degraded.
- Action: Professional upholsterer replaced foam, added new coil springs, repaired minor frame issues, and reupholstered in a luxury fabric.
- Cost: $1,000–$1,500 range.
- Outcome: A heirloom-quality piece with modern comfort, likely to last decades longer.
17. Frequently Asked Questions (FAQ)
Q1: How do I know if my sofa is worth repairing?
Answer: Consider the sofa’s original cost, sentimental or design value, and overall condition. If the frame is sturdy and you love its style, repair is often more cost-effective and eco-friendly than replacing.
Q2: Which foam density should I choose to avoid future sagging?
Answer: For seat cushions, densities around 2.0–2.5 lb/ft³ are good. Some premium sofas use up to 3.0 lb/ft³ for a firmer feel and longevity.
Q3: Can I fix my sofa’s sagging without removing the dust cover?
Answer: Minor fixes, like adding a support board under cushions, might not need full access. But for more comprehensive repairs (springs, frame), you generally must remove or partially remove the dust cover.
Q4: Should I replace all springs or just the broken ones?
Answer: While you can replace individual broken springs, if several are worn or the entire set is old, it’s more efficient to replace them all at once.
Q5: Do furniture warranties cover sagging?
Answer: Many warranties classify “normal wear and tear” as not covered. Check your product’s terms. Some high-end brands offer limited coverage if sagging occurs within a set time frame due to manufacturing defects.
18. When to Replace vs. When to Repair
While this guide emphasizes sagging sofa repair, there are instances where replacement is a more pragmatic solution.
18.1 Signs It’s Time for a New Sofa
- Severely Cracked or Rotted Frame: If repairs would exceed half the cost of a new sofa.
- Multiple Major Issues: E.g., broken frame, destroyed cushions, heavily worn upholstery.
- Non-Removable Stains or Odors: If the sofa is beyond hygienic redemption.
- Change in Taste or Space: If you’ve redecorated or moved and the old sofa doesn’t fit.
18.2 Combining Repair and Replacement
Some homeowners refurbish the main sofa but buy new complementary pieces. Alternatively, you could repair your sofa for a short term and plan to replace it in a few years. This approach extends its life just long enough until budget or style preferences align with a brand-new purchase.
19. Trends and Innovations in Sofa Repair
In the evolving furniture industry, new innovations are making sofa repair more accessible and durable:
19.1 Modular Sofa Designs
- Easily Replaceable Components: Some contemporary sofas have modular frames and cushions, allowing quick swaps of worn-out parts.
19.2 Sustainable Foam Technologies
- Soy-Based or Bio-Foam: Reduced petroleum content for eco-conscious consumers.
- Open-Cell Structures: Better resilience, breathability, and less tendency to sag.
19.3 3D Printed Parts
- Custom Brackets or Clips: 3D printing can supply small, specialized components no longer produced for older sofa models.
- Fast Prototyping: Minimizes downtime waiting for rare parts.
19.4 Smart Sofa Solutions
- Sensors: Some prototypes feature built-in sensors to detect weight distribution and alert you when certain sections might be sagging.
- App-Integrated: Adjust seat firmness or track usage over time (still in early stages for mainstream products).
20. Conclusion
A sagging sofa isn’t just an unsightly problem; it impacts comfort, posture, and the longevity of your furniture. Thankfully, sagging sofa repair can be approached in various ways—from simple cushion replacements and quick under-seat support boards to comprehensive professional reupholstery. By correctly identifying the cause (be it frame, springs, or foam), selecting high-quality materials, and performing regular maintenance, you can significantly extend the life of your sofa.
Key Takeaways:
- Diagnose thoroughly: Check frame integrity, springs, and foam condition.
- Balance cost vs. benefit: Evaluate if a DIY fix, professional repair, or a new sofa is best.
- Prioritize quality materials: High-density foam and durable webbing reduce future sagging risk.
- Maintain regularly: Simple routines like rotating cushions and avoiding overuse can keep sagging at bay.
- Consider sustainability: Repairing instead of discarding helps the environment and saves money.
By following the advice laid out in this guide, you’ll have all the information and confidence needed to restore your sofa’s shape and comfort. Whether you choose a straightforward DIY hack or a top-tier reupholstery service, there’s a solution to every sagging situation—granting your sofa a second lease on life and restoring that cozy, inviting space in your home.