


sofa repair at home
Table of Contents
- Introduction to Sofa Repair
- Common Types of couch Damage
- Essential Tools and Materials for Sofa Repair
- Step-by-Step Guide: Assessing Sofa Damage
- Repairing Wooden Sofa Frames
- Fixing Springs and Webbing
- Replacing and Repairing Sofa Cushions
- Sofa Upholstery Repair
- Leather settee Repair
- Fabric couch Repair
- Reupholstering a Sofa: The Complete Process
- Foam Replacement and Padding Issues
- DIY Sofa Repair vs. Professional Services
- Eco-Friendly Sofa Repair and Sustainability
- Cost Analysis and Budget Considerations
- Long-Term Maintenance Tips
- Troubleshooting Common Sofa Problems
- Safety Precautions and Best Practices
- Case Studies: Real-Life Sofa Repair Examples
- Frequently Asked Questions (FAQ)
- Conclusion
1. Introduction to couch Repair
Sofas are the centerpiece of our living spaces: we lounge on them, share intimate family moments, entertain guests, and relax after a long day. Over time, however, these beloved pieces of furniture can start showing signs of wear and tear—torn upholstery, sagging cushions, wobbly frames, or squeaking springs. When these problems arise, many homeowners consider replacing their sofas altogether. Yet, sofa repair is a highly practical and cost-effective alternative that can restore your couch’s comfort, functionality, and aesthetic appeal, often at a fraction of the price of buying a new one.
In this comprehensive guide, we will delve into every aspect of sofa repair. Whether you’re a DIY enthusiast looking to fix a minor tear, a homeowner with a sagging couch, or someone considering a complete reupholstery project, the information here will help you make informed decisions and tackle your sofa problems with confidence.
1.1 Why Repair Instead of Replace?
- Cost Savings: The price of a new sofa can run into hundreds or even thousands of dollars. Repairing extends the life of your existing piece for much less.
- Sentimental Value: Sofas often carry memories. Some are family heirlooms or unique pieces that match your home’s décor perfectly. Repair allows you to preserve that sentimental value.
- Eco-Friendly Choice: Repairing helps reduce landfill waste, conserves resources, and promotes sustainability.
- Customization: During a repair or reupholstery project, you can update the design, fabric, or cushioning to better suit your tastes and needs.
1.2 Who Can Benefit from This Guide?
- Homeowners looking to save money and revive their living room.
- Landlords wanting to maintain rental property furniture without constant replacements.
- Interior Designers seeking expertise on how to prolong the life of high-end sofas.
- DIY Enthusiasts interested in hands-on furniture projects.
- Professional Upholsterers who might appreciate a structured, in-depth reference.
By the end of this guide, you’ll have a robust understanding of different sofa repair techniques, from basic touch-ups to advanced upholstery methods. Let’s dive in!
2. Common Types of Sofa Damage
Understanding the different types of sofa damage is the first step toward a successful repair. Below are the most common issues you might face:
- Worn or Torn Upholstery: Fabric, leather, or vinyl can tear, develop holes, or fray over time.
- Sagging Cushions: Foam or padding may lose its shape, leading to an uncomfortable seating experience.
- Broken Springs: Sofa springs can snap or lose tension, causing uneven support.
- Damaged Frame: Wooden frames can crack, split, or become loose at the joints.
- Surface Stains and Discoloration: Spills, sunlight, and everyday wear can create unsightly stains or faded spots.
- Odors: Pet accidents, smoke, or moisture can embed unpleasant smells into the upholstery and cushions.
Each of these issues requires a distinct approach in terms of materials, tools, and methods. Some problems—like basic stains or cushion flattening—are relatively straightforward to fix. Others—like a fully broken frame or advanced leather repair—can be more challenging and might require specialized expertise.
3. Essential Tools and Materials for Sofa Repair
Before beginning any sofa repair project, it’s crucial to gather the right tools and materials. Having a well-equipped workspace not only simplifies the repair process but also ensures better results.
3.1 Hand Tools
- Screwdrivers (flat-head, Phillips): Removing and tightening screws on frames or brackets.
- Staple Remover: Essential for removing old staples from upholstery.
- Pliers: For pulling out nails, tacks, and old staples.
- Rubber Mallet: Helpful for gently knocking wooden parts back into place.
- Measuring Tape: To accurately measure fabric, padding, or wood segments.
- Utility Knife: For cutting fabric, foam, or other materials.
3.2 Power Tools
- Staple Gun (pneumatic or electric): For reattaching upholstery or webbing.
- Drill: For creating pilot holes or driving screws into hardwood frames.
- Random Orbital Sander (Optional): If you plan to refinish wooden parts.
3.3 Upholstery-Specific Items
- Upholstery Staples: Usually 22-gauge staples, but check your staple gun’s requirements.
- Upholstery Nails or Tacks: Decorative or hidden nails to secure fabric.
- Twine or Webbing: For re-webbing seat decks.
- Foam and Batting: Replacing old or compressed cushioning.
- Fabric or Leather: Matching or contrasting material for upholstery repair.
- Thread and Needles: Heavy-duty thread and upholstery needles for stitching tears.
3.4 Adhesives and Fillers
- Wood Glue: For repairing broken frame joints.
- Fabric Glue: For small fabric tears when stitching isn’t possible.
- Leather Repair Kits: Typically include adhesive, patches, and colorants for leather restoration.
- Wood Filler: For filling cracks or gouges in a wooden frame.
3.5 Safety Gear
- Gloves: Protect your hands from cuts, abrasions, and chemicals.
- Safety Glasses: Essential when working with power tools or removing staples under tension.
- Dust Mask or Respirator: Useful when sanding wood or dealing with old, dusty upholstery materials.
Having these tools and materials on hand will streamline your sofa repair project, keeping you prepared for the various stages of restoration—whether it’s frame reconstruction, cushion replacement, or a complete upholstery overhaul.
4. Step-by-Step Guide: Assessing Sofa Damage
A thorough assessment is the foundation of a successful repair. Rushing into a fix without diagnosing all underlying issues can lead to incomplete results or further damage.
4.1 Visual Inspection
- Frame: Look for cracks, splits, or wobbly joints. Notice any sagging corners that might indicate structural damage.
- Upholstery: Check for tears, stains, worn-out patches, or discoloration.
- Cushions: Examine foam density, lumps, and the overall shape.
- Hardware: Inspect any screws, brackets, or rails for signs of corrosion or looseness.
4.2 Touch and Feel
- Sit-Down Test: Sit in different spots to identify sagging or uneven support.
- Press Check: Press down on cushions to sense lumps or flattening.
- Shake the Frame: Gently rock the sofa to detect any wobbling or squeaking sounds from the frame or springs.
4.3 Identifying Root Causes
- Sagging Couch: Could be due to worn foam, loose springs, or frame damage.
- Torn Fabric: Might result from friction, pet claws, or general wear over time.
- Musty Smell: Often linked to moisture trapped in the cushions or underlying mold issues.
4.4 Prioritizing Repairs
Once you identify the damage, prioritize tasks based on severity and difficulty. For instance:
- Structural Repairs First: A stable frame and secure springs are essential.
- Cushion and Upholstery Repairs: After the structure is sound, move on to comfort and aesthetics.
- Finishing Touches: Stain removal, color matching, or decorative elements like piping and tufting come last.
A thorough assessment helps you create a repair roadmap, ensuring you allocate time and resources efficiently. This approach also aids in deciding whether a DIY approach is viable or if professional assistance is needed—especially if extensive carpentry, advanced upholstery, or specialized leather repair is required.
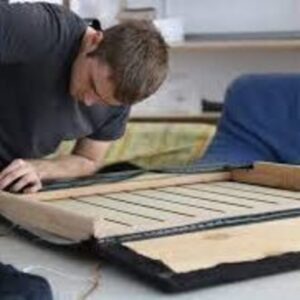
5. Repairing Wooden Sofa Frames
A robust frame is the backbone of any sofa. Wooden frames, typically constructed from hardwoods like oak, maple, or birch, can break or weaken over time. Correctly repairing the frame prolongs the sofa’s lifespan and ensures a comfortable seating experience.
5.1 Common Frame Issues
- Cracked or Split Wood: Often caused by heavy usage or sudden impact.
- Loose Joints: Joints can loosen if the wood shrinks or the glue deteriorates.
- Warped Boards: Poor storage conditions or humidity fluctuations can warp panels.
5.2 Step-by-Step Frame Repair
- Disassembly: Remove cushions and upholstery (if necessary) to expose the wooden structure.
- Clean and Prepare: Remove old staples, nails, or screws around the damaged area. Sand any rough edges.
- Apply Wood Glue: Use high-quality wood glue on cracks or joints. Clamp the sections firmly to ensure tight bonding.
- Reinforce with Screws or Brackets: Countersink screws for a neat finish. Metal brackets may be added for extra stability.
- Allow Proper Drying Time: Most wood glues require at least 24 hours to cure fully.
- Inspect for Alignment: Before reupholstering, make sure the frame is square and level.
5.3 Frame Refinishing
If the frame is partially visible, consider refinishing:
- Strip Old Finish: Use a chemical stripper or sandpaper to remove varnish or paint.
- Repair Surface Imperfections: Fill cracks or holes with wood filler.
- Sand Smooth: Progressively move from coarse to fine-grit sandpaper for a smooth surface.
- Apply Stain or Paint: Choose a color that complements the sofa’s existing or future upholstery.
- Seal: Use a protective finish like polyurethane or lacquer.
5.4 Preventive Measures
- Use Proper Support: Avoid placing excessive weight on sofa arms or unsupported edges.
- Environmental Control: Maintain moderate humidity levels to prevent wood warping.
- Tighten Screws Periodically: A quick check every six months can help prevent loose joints.
Repairing a wooden sofa frame can be a rewarding process, especially if you appreciate craftsmanship. With patience and the correct techniques, you’ll restore your sofa’s backbone, ensuring longevity and comfort for years to come.
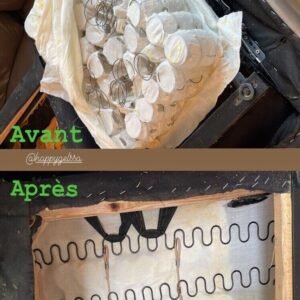
6. Fixing Springs and Webbing
When a sofa starts to sag or produces annoying squeaks, the culprits are often springs or webbing—the components that support seat cushions and maintain seating comfort.
6.1 Types of Sofa Springs
- Coil Springs: Traditional, higher-end option that offers deep, resilient comfort. Typically tied in an eight-way hand-tied system.
- Sinuous (S- or Zigzag) Springs: Common in modern sofas, featuring S-shaped wires attached to the frame.
- Webbing: Strips of fabric or elastic material, often found in European designs or lower-cost models.
6.2 Diagnosing Spring Problems
- Visual Inspection: Look under the sofa or remove the dust cover to see if springs are stretched, broken, or detached from the frame.
- Touch and Pressure: Push down on seat cushions. If certain areas feel looser, the springs beneath might be weak or broken.
- Noises: Squeaks or groans usually indicate friction between metal components or unlubricated joints.
6.3 Steps to Repair Springs
- Remove Coverings: Gently remove the dust cover to access the spring system.
- Identify the Damaged Springs: Mark or note which springs need attention.
- Reattach or Replace:
- Reattach: If the spring is detached from the frame, use clips or staples to secure it back.
- Replace: For broken springs or severely worn ones, measure and install new springs of the same type.
- Tightening: Some coil springs can be tightened with tie wire or adjusting tension.
- Check Anchors and Clips: Ensure that the metal clips securing springs to the frame are not bent or corroded. Replace them if needed.
6.4 Repairing Webbing
- Remove Old Webbing: Cut or unstaple the old strips.
- Measure and Cut New Webbing: Leave extra length for secure stapling.
- Staple or Tack: Stretch the webbing across the frame and secure firmly on both ends.
- Weave for Support: For a seat deck, alternate horizontal and vertical strips for a strong mesh.
- Double-Check Tension: The webbing should be tight but not overly stretched.
6.5 Maintenance Tips
- Rotate Cushions: Minimizes uneven wear on certain springs.
- Avoid Jumping: Prevent kids (or adults) from jumping on the sofa to reduce spring stress.
- Regular Inspection: Minor fixes early on can prevent major replacements later.
When done correctly, fixing springs or webbing can dramatically improve the overall feel of your sofa. Repaired or upgraded spring systems can bring back the “like-new” bounce and eliminate annoying noises, providing a comfortable seat for all.
7. Replacing and Repairing Sofa Cushions
Cushions are pivotal to a sofa’s comfort and appearance. Over time, they can become flattened, lumpy, or torn, prompting many to consider cushion repair or replacement.
7.1 When to Repair vs. Replace
- Minor Damage: Small tears, minor flattening, or localized lumps can often be fixed with patching, re-fluffing, or partial foam replacement.
- Major Damage: If the entire cushion feels unsupportive, is heavily stained, or the foam is disintegrating, total replacement is more practical.
7.2 Types of Cushion Fill
- Polyurethane Foam: Most common; available in varying densities and firmness levels.
- Memory Foam: Offers contouring support, though more expensive than basic foam.
- Down or Feather: High-end, plush feel but requires frequent fluffing.
- Poly-Fiber Fill: Commonly used for back cushions, offering a softer, looser support.
7.3 Basic Cushion Repair Steps
- Open the Cushion Cover: Use a zipper or carefully unpick stitches.
- Inspect the Foam: Check for crumbling, mold, or lumps.
- Re-Fluff or Add Padding: If the foam is basically intact, adding a polyester batting wrap can improve shape and softness.
- Patch Minor Tears: For small holes in foam, use foam adhesive or fill material.
- Re-Stitch the Cover: If the cushion cover is torn, patch or replace that section of fabric, then sew it closed with heavy-duty thread.
7.4 Complete Foam Replacement
- Measure Dimensions: Length, width, and thickness of the old foam.
- Choose Density and Firmness: For seat cushions, a higher density foam (e.g., 1.8 – 2.5 lb/ft³) offers better longevity.
- Cut the Foam: Use an electric carving knife or dedicated foam saw for precision.
- Wrap the Foam: Polyester batting around foam edges gives a rounded, professional appearance.
- Insert Into Cover: Gently work the foam in to avoid tearing the fabric or foam edges.
7.5 Tips for Longevity
- Rotate Cushions Weekly: Even out wear.
- Use Protective Covers: Ideal if you have pets, young children, or frequent spills.
- Regular Vacuuming: Remove dust and debris that can degrade cushion materials over time.
Replacing or repairing sofa cushions can dramatically improve comfort, often making your sofa feel brand-new again. The process is relatively straightforward, especially if you source high-quality foam and take accurate measurements.
8. Sofa Upholstery Repair
Upholstery not only adds aesthetic appeal but also protects the underlying structure from daily wear. Whether your sofa is covered in fabric, leather, or a synthetic blend, upholstery repair can breathe new life into a tired or damaged piece.
8.1 Common Upholstery Issues
- Rips and Tears: Caused by sharp objects, pet claws, or normal wear over time.
- Worn Fabric: Areas like armrests and seat edges can become threadbare.
- Loose Seams: Seams can unravel, leaving visible gaps.
- Fading and Discoloration: Sunlight, chemicals, or age can bleach or change the fabric color.
8.2 Fabric Selection for Upholstery Repair
- Durability: High-traffic couches do best with tough fabrics like microfiber or blended synthetics.
- Color and Pattern: Consider existing décor and choose complementary shades.
- Cleanability: If you have kids or pets, stain-resistant fabrics (e.g., Crypton) are ideal.
- Breathability: Natural fibers like cotton or linen are breathable but might be less durable over time.
8.3 Methods for Fixing Upholstery Damage
- Hand Stitching: For small tears or open seams. Use a needle and heavy-duty thread for durability.
- Iron-On Patches: Quick fix for small holes, though less aesthetically pleasing if visible.
- Upholstery Patches: Professional kits allow color matching and blending for invisible mending.
- Panel Replacement: For more extensive damage, replace an entire panel of the sofa (like the backrest or a seat cushion cover).
8.4 Detailed Steps to Reupholster a Section
- Remove Staples and Old Fabric: Use a staple remover or pliers carefully.
- Create a Template: Lay the old fabric on new material to trace a pattern.
- Cut and Align: Cut the new fabric, ensuring patterns or weaves align.
- Staple or Sew: Attach the new piece, pulling it taut for a smooth finish.
- Trim Excess: Remove leftover fabric for a neat look.
8.5 Preventive Care for Upholstery
- Regular Vacuuming: Minimizes dirt buildup.
- Immediate Spill Cleanup: Prevents staining.
- Fabric Protector Spray: Adds a layer of protection against spills and pet accidents.
- Rotate Cushions: Ensures even fabric wear.
By addressing upholstery issues promptly and effectively, you not only maintain your sofa’s visual appeal but also protect its structural components. Whether opting for a simple patch or a more involved panel replacement, a well-executed upholstery repair can significantly extend your sofa’s lifespan.
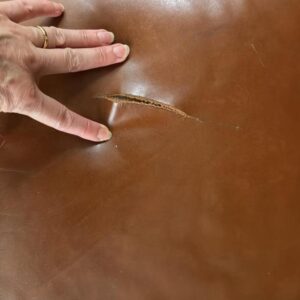
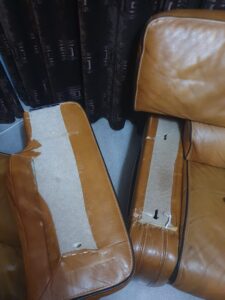
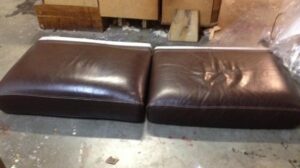
9. Leather Sofa Repair
Leather sofas exude a timeless elegance, but they’re also prone to specific types of damage, from scratches and scuffs to cracks and fading. Proper leather repair techniques can restore both appearance and functionality, keeping your high-end piece looking immaculate.
9.1 Common Leather Problems
- Scratches: Often from pets or sharp objects.
- Cracks: Caused by dryness, lack of conditioning, or direct sunlight.
- Discoloration: UV exposure and natural oils can cause uneven fading.
- Peeling or Flaking: Seen in lower-quality “bonded” leather or poorly maintained surfaces.
9.2 Types of Leather
- Full-Grain Leather: Highest quality, retains natural grain.
- Top-Grain Leather: Sanded to remove imperfections, still high-end.
- Corrected-Grain or Bonded Leather: Less durable, often with a synthetic top layer.
- Suede/Nubuck: A softer, brushed finish, requiring specialized cleaning methods.
9.3 Leather Repair Kits
Many retail or online outlets sell leather repair kits containing:
- Cleaning Solution: Prepares the leather by removing oils and dirt.
- Filler Compound: Fills cracks or scratches.
- Colorant: Matches the original leather color.
- Finish or Sealant: Protects the restored area.
9.4 Basic Leather Repair Process
- Clean the Surface: Wipe the area with a mild leather cleaner to remove oils and debris.
- Sand Lightly (If Needed): For deeper scratches or cracks, gently sand with fine-grit sandpaper to create a smooth surface.
- Apply Filler: Use a palette knife or similar tool to fill cracks or scratches with leather filler. Allow to dry and repeat if necessary.
- Color Matching: Mix the colorant from the kit to match your sofa’s tone, applying it in thin layers.
- Seal and Protect: Apply a clear sealer or finish to protect the repaired section.
9.5 Advanced Techniques
- Heat Curing: Some professional repair shops use heat guns to speed up the curing process of fillers and dyes.
- Leather Patches: For large holes, a patch of matching leather might be glued and blended.
- Re-Dyeing: For widespread discoloration, a complete re-dyeing may be necessary, which can be complex and time-consuming.
9.6 Long-Term Leather Care
- Conditioning: Apply a good leather conditioner every 6–12 months to prevent dryness.
- Avoid Direct Sunlight: UV rays can cause fading and drying.
- Use Leather-Friendly Cleaners: Harsh chemicals strip natural oils and damage the finish.
With proper care and timely repairs, a leather sofa can last for decades. The investment in quality products and some patience can keep it looking luxurious and inviting for years to come.
10. Fabric Sofa Repair
Fabric sofas come in a wide variety of weaves, colors, and patterns—making them a go-to choice for many homeowners. Like leather, fabric sofas can develop tears, stains, or general wear. With the right approach, you can repair these issues and maintain a fresh, vibrant look.
10.1 Common Fabric Types
- Cotton: Breathable and affordable but prone to wrinkling and stains.
- Linen: Luxurious but easily wrinkles and can be tricky to clean.
- Polyester or Microfiber: Durable, stain-resistant, and budget-friendly.
- Velvet: Soft and plush, though requires careful cleaning to avoid crushing the pile.
- Chenille: Fuzzy texture, comfortable but can snag easily.
10.2 Fabric Repair Techniques
- Hand-Stitching: Ideal for smaller tears. Use a ladder stitch for invisible seams.
- Patching: Cut a fabric patch slightly larger than the tear and secure it from the inside.
- Fusible Webbing: A quick fix where you place webbing under the tear and iron it in place.
- Mending with a Sewing Machine: For larger tears or if multiple panels are damaged.
10.3 Stain Removal
- Identify the Stain Type: Oil-based, water-based, ink, etc.
- Blot, Don’t Rub: Immediately blot spills with a clean cloth to avoid pushing them deeper.
- Use Appropriate Cleaners: Spot-test any commercial cleaner on an inconspicuous area first.
- Steam Cleaning: Regular steam cleaning can rejuvenate overall fabric appearance and remove deeper grime.
10.4 Fabric Replacement
If the damage is extensive, consider partial or full panel replacement:
- Match Fabric: Finding the same dye lot or a close match can be challenging if the sofa is older.
- Remove Old Upholstery: Carefully detach the damaged fabric.
- Cut New Panel: Using the old piece as a template.
- Attach to Frame: Staple securely, maintaining consistent tension to avoid wrinkles.
10.5 Preventive Measures
- Regular Vacuuming: Removes dust and prevents fibers from trapping dirt.
- Reversible Cushion Covers: Flip cushions to even out wear.
- Avoid Direct Sunlight: Minimizes fading.
- Scotchgard or Fabric Protection: A protective spray can repel liquids and stains.
By swiftly tackling minor rips and stains, you’ll prolong your fabric sofa’s lifespan and maintain a clean, inviting look. Whether it’s a modest patch repair or a more ambitious reupholstery endeavor, fabric sofa repair can be surprisingly manageable with the proper tools and techniques.
11. Reupholstering a Sofa: The Complete Process
For those seeking a significant transformation or dealing with extensive damage, reupholstering a sofa can be a game-changer. While more complex than simple repairs, reupholstery renews both style and structural integrity, effectively giving your sofa a second life.
11.1 Reasons to Reupholster
- Extensive Wear: If numerous panels are ripped, stained, or faded, partial fixes may not suffice.
- Upgrade Aesthetics: Change the fabric or color to suit an updated décor.
- Preserve a Quality Frame: High-end, antique, or sentimental frames are worth retaining.
- Eco-Friendly: Reduces waste by preventing a still-functional sofa from ending up in a landfill.
11.2 Timeline and Cost
- DIY Approach: Can take several days to a couple of weeks, depending on your skill level. Costs range from $200 to $600 for materials.
- Professional Service: Typically 2–4 weeks turnaround, with costs anywhere from $600 to $2,000+, influenced by fabric choice and the sofa’s size.
11.3 Step-by-Step Reupholstery Guide
- Strip the Old Upholstery
- Remove staples, tacks, and fabric carefully to avoid damaging the frame or foam.
- Take note of how pieces were originally attached.
- Evaluate the Frame and Springs
- Inspect and repair any frame or spring issues. Re-tighten screws or reattach springs if necessary.
- Replace Foam and Batting
- Remove worn foam from cushions and seat decks.
- Install fresh foam or batting to restore shape and comfort.
- Cut the New Fabric
- Use old fabric pieces as templates. Mark the orientation to align patterns or weaves consistently.
- Attach the Fabric
- Begin with the deck (seat area), then the inside arms, inside back, and outside pieces.
- Staple from the center outward, pulling fabric tight to avoid wrinkles.
- Reassemble Cushions
- Place new foam in cushion covers and close them securely.
- Add decorative elements like piping or tufting if desired.
- Finishing Touches
- Attach trim, decorative nails, or tufting buttons if applicable.
- Inspect for any wrinkles, lumps, or missed staples. Make final adjustments.
11.4 Choosing the Right Fabric
- Durability: For high-traffic areas, opt for tightly woven, stain-resistant materials.
- Color and Pattern: Consider existing décor and personal preferences. Neutrals are versatile, while bold patterns can be statement-making.
- Fabric Weight: Heavier upholstery-grade fabrics last longer but can be challenging to sew.
11.5 Post-Reupholstery Care
- Regular Vacuuming: Keeps new fabric clean.
- Spot Cleaning: Tackle spills immediately.
- Cushion Rotation: Maintain even wear on seat cushions.
Reupholstering is an involved process, but the reward is a sofa that looks and feels brand new. From color selection to final assembly, each step brings the piece closer to a custom-finished masterpiece you can enjoy for years.
12. Foam Replacement and Padding Issues
One of the most common complaints about older sofas is the loss of comfort due to flattened or deteriorating foam. Whether your cushions feel lumpy or the backrest seems deflated, foam replacement is often the solution.
12.1 Why Foam Fails
- Age and Usage: Repeated compression eventually breaks down the foam’s cell structure.
- Low-Quality Foam: Cheaper foam degrades faster, leading to sagging and lumps.
- Moisture and Mold: Spills or humidity can facilitate mold growth, compromising foam integrity.
- Improper Support: Poor spring or webbing tension speeds up foam wear.
12.2 Foam Density and ILD (Indentation Load Deflection)
- Density (lb/ft³): Higher density typically equals better durability. Common densities range from 1.5 to 2.5 for residential sofas.
- ILD: Measures firmness. A higher ILD rating means a firmer cushion.
12.3 Types of Foam
- Conventional Polyurethane Foam: Affordable, medium durability.
- High-Density Foam (HR Foam): Longer-lasting, better resilience.
- Memory Foam: Conforms to body shape, but more expensive and less breathable.
- Latex Foam: Natural, highly durable, but pricier.
- Poly-Fiber Fill: Often used as a top layer for softness.
12.4 Foam Replacement Process
- Measure Existing Foam: Length, width, and thickness.
- Select the Right Density: Consider usage patterns (e.g., a family couch vs. a decorative sofa).
- Cut Foam: Use an electric carving knife or specialized foam saw.
- Add Batting: Wrapping foam in batting creates a smoother, plump appearance.
- Insert into Cushion Cover: Ensure you don’t twist or compress the foam too aggressively.
12.5 Padding Repairs Beyond Seat Cushions
- Back Cushions: May need a mix of shredded foam or polyester fiberfill.
- Armrests: Often neglected but can dramatically improve comfort when refilled.
- Pillows and Throw Cushions: Simple replacements or additions for extra lumbar support.
12.6 Maintenance Tips
- Flip Cushions Regularly: Even wear.
- Allow Foam to Air Out: Avoid trapping moisture in cushions.
- Vacuum and Spot Clean: Prevent dirt buildup that breaks down foam over time.
Replacing old, sagging foam can make a dramatic difference in how your sofa looks and feels. With the right materials and method, you can restore that fresh, supportive seating experience even on an older piece of furniture.
13. DIY Sofa Repair vs. Professional Services
Choosing between a DIY approach and hiring a professional upholsterer can be a pivotal decision in your sofa repair journey. Each route has its pros and cons, influenced by factors such as budget, time, skill, and the complexity of the damage.
13.1 Advantages of DIY Sofa Repair
- Cost Savings: Doing the work yourself typically costs less in labor, though you’ll pay for materials and tools.
- Personal Satisfaction: Completing a project with your own hands can be rewarding.
- Creative Control: You decide every detail—from fabric selection to finishing touches—without compromise.
- Learning Experience: Gain new skills, which can be applied to future furniture repairs.
13.2 Downsides of DIY
- Time-Consuming: Complex reupholstery can take days or weeks, especially for beginners.
- Skill Requirements: Detailed tasks like tufting, piping, or advanced sewing may require practice.
- Tool Costs: Investing in a heavy-duty staple gun, upholstery needles, etc., can add up.
- Risk of Mistakes: Misaligned fabric or improper frame repair could lead to subpar results.
13.3 Benefits of Professional Services
- Expertise and Experience: Trained upholsterers handle a wide range of materials and techniques daily.
- Quality Finishes: Professionals can achieve seamless upholstery, perfect tufting, and precise patterns.
- Time Efficiency: A workshop has specialized equipment and staff, speeding up the process.
- Warranty or Guarantee: Many pros offer warranties on their work.
13.4 Potential Drawbacks of Hiring a Pro
- Higher Cost: Labor can be significant, especially for large sofas or premium materials.
- Less Creative Input: While you can specify fabric and style, some decisions might be guided by the upholsterer’s preferences.
- Waiting Period: Popular workshops may have long lead times.
13.5 Making the Decision
- Assess Skill Level: Do you have experience with upholstery or woodworking?
- Evaluate Complexity: Large tears, broken frames, or intricate designs might warrant professional help.
- Budget: If funds are tight, a partial DIY approach might be feasible—like removing old staples or cushions yourself, then hiring a pro for reupholstery.
- Time Constraints: Do you have the spare time to complete the project?
In many cases, a hybrid approach works best: handle simpler tasks like cushion replacement or minor tear mending on your own, and leave major reupholstery or complex structural fixes to the experts. Balancing cost, expertise, and desired outcome ensures you make the best choice for your sofa.
14. Eco-Friendly Sofa Repair and Sustainability
In a world increasingly focused on sustainability, sofa repair aligns perfectly with eco-conscious living. Instead of discarding furniture, repairing or reupholstering reduces waste, preserves resources, and can even be beneficial to your health by avoiding new chemical off-gassing.
14.1 Environmental Benefits of Repairing Sofas
- Reduced Landfill Waste: Each salvaged sofa is one less item in our overburdened landfills.
- Conservation of Materials: Fewer trees cut for new frames, less synthetic foam production, and decreased textile manufacturing.
- Lower Carbon Footprint: Avoiding transportation and manufacturing processes associated with new sofas.
14.2 Sustainable Materials
- Recycled Fabrics: Some upholstery fabrics are made from plastic bottles or reclaimed fibers.
- Organic Cotton or Hemp: Grown without harmful pesticides, these fabrics are eco-friendly alternatives.
- Natural Latex Foam: Harvested from rubber trees, offering a biodegradable cushion option.
- Recycled Foam: Some companies produce foam with a portion of recycled content.
14.3 Eco-Conscious Repair Techniques
- Minimal Use of Chemicals: Opt for low-VOC adhesives and water-based stains or finishes.
- Wood Reclamation: Use salvaged or reclaimed wood for frame reinforcements.
- Local Sourcing: Purchase materials from nearby suppliers to reduce transportation emissions.
14.4 Upcycling and Creative Repurposing
- Patchwork or Mix-and-Match Fabrics: Give an artistic flair while reducing waste.
- Reuse Old Frame Parts: If a sofa is beyond salvage, repurpose the wood for shelves or smaller furniture items.
- DIY Accent Pillows: Use leftover fabric scraps to create coordinated throw pillows.
14.5 Professional Green Upholstery Services
Many upholstery shops now specialize in green practices, offering:
- Certified Sustainable Fabrics
- Eco-Friendly Foam Options
- Biodegradable Packaging
- Recycling or Donation Programs for removed materials
By opting for eco-friendly sofa repair, you preserve the planet’s resources, reduce waste, and can even improve indoor air quality. Plus, a sustainably restored piece carries a unique charm—a story of renewal, craftsmanship, and care for the environment.
15. Cost Analysis and Budget Considerations
While sofa repair is often more economical than replacement, costs can vary widely. Factors like the extent of damage, fabric choice, and whether you DIY or hire a pro all influence the bottom line.
15.1 Typical DIY Costs
- Tools: Staple gun, pliers, sewing kit, etc. can total $50–$200 if you don’t already own them.
- Materials: Fabric, foam, batting, glue, and hardware can range from $50 to several hundred dollars.
- Time Investment: Your labor is “free,” but time is a valuable resource—some large projects can take multiple weekends.
15.2 Professional Repair Costs
- Inspection and Consultation: Some upholsterers charge a fee ($50–$100) to assess damage.
- Labor: Ranges from $40–$100 per hour, depending on region and experience.
- Materials Markup: Fabric and foam through a shop can be more expensive but may include warranties or guarantees.
- Complexity Surcharges: Intricate designs, tufting, piping, or premium fabrics can increase costs.
15.3 Factors Affecting Budget
- Size of the Sofa: A three-seater costs more to reupholster than a loveseat.
- Fabric Quality: Premium or designer fabrics can inflate the project budget.
- Frame Condition: Extensive repairs or replacements raise the total cost.
- Additional Features: Recliners, electric controls, or built-in storage complicate repairs.
15.4 Ways to Save Money
- Partial Repairs: If only certain panels or cushions are damaged, replace those instead of the entire sofa.
- Sales and Discounts: Watch for seasonal sales on upholstery fabric.
- Bulk Purchasing: If you’re tackling multiple furniture pieces, buy materials in bulk to get a discount.
- DIY Prep Work: Remove old staples, cushions, or fabrics before taking the sofa to a pro. This can lower labor fees.
15.5 Assessing Value
Ask yourself:
- What’s the Sofa’s Original Quality? A sturdy hardwood frame might be worth the investment.
- Sentimental or Heirloom Value? Priceless to you, so cost becomes secondary.
- Alternative Replacements? Compare the total repair estimate to the price of a brand-new sofa of similar quality.
Balancing costs and outcomes is key. In many cases, spending a few hundred dollars on repairs for a well-built sofa can yield a better return on investment than buying a cheaply made new piece.
16. Long-Term Maintenance Tips
Congratulations! Your sofa is repaired or fully reupholstered. To keep it in top shape for years to come, practice consistent long-term maintenance.
16.1 Regular Cleaning
- Vacuum Weekly: Removes dust, debris, and pet hair.
- Spot Clean Spills Immediately: Prevents stains from setting in.
- Professional Deep Cleaning: Every 12–18 months for high-traffic sofas.
16.2 Cushion Rotation
- Flip and Rotate seat cushions once every two weeks to distribute wear evenly.
- Plump or Fluff cushion inserts, especially down- or fiber-filled cushions, to maintain shape.
16.3 Sunlight Protection
- Use Blinds or Curtains: Prolonged sun exposure fades fabrics and dries out leather.
- Furniture Placement: Avoid direct sun if possible, or use UV-protective window films.
16.4 Humidity and Temperature Control
- Use a Dehumidifier: High moisture levels can lead to mold or mildew.
- Avoid Extreme Heat: Leather can crack and fabric can shrink or discolor in excessive heat.
16.5 Pet and Child Proofing
- Protective Covers: Removable slipcovers or throws can protect the sofa from spills, fur, and scratches.
- Regular Grooming of Pets: Minimize shedding and reduce claw damage.
- Set Rules: Teach kids not to jump on furniture or eat messy foods on the sofa.
16.6 Routine Inspections
- Check Frame Tightness: Retighten screws or brackets annually.
- Inspect Springs: Listen for new squeaks or sagging; address issues early.
- Touch-Up Repairs: Patch small fabric tears or add leather conditioner if dryness is visible.
Consistent upkeep drastically extends the life of your sofa, keeping it looking and feeling fresh. A few minutes of maintenance each week can stave off extensive future repairs.
17. Troubleshooting Common Sofa Problems
Even with diligent maintenance, issues can arise. Here’s a quick troubleshooting guide for some of the most common sofa problems:
ProblemLikely CauseSolutionSagging seatWorn springs, deteriorated foam, or webbingCheck spring tension, replace foam, re-web if necessaryWobbly frameLoose or broken joints, missing screwsReinforce joints with glue, screws, or bracketsTorn upholstery seamStress on a weak seam, low-quality stitchingHand-sew or machine-sew with heavy-duty thread; consider patching for larger tearsSqueaking soundsFriction between springs and frame, unlubricated jointsApply lubricant to spring anchor points, reattach loose hardwareOdor or musty smellMold growth, pet accidents, or trapped moistureRemove and replace affected foam or fabric; ensure the frame dries completely to avoid moldFading or discolorationUV rays or chemical damageUse UV-blocking window treatments, consider fabric dyes or partial reupholstery for severely faded areasRough or peeling leatherLack of conditioning or low-quality bonded leatherCondition regularly with leather treatments; for severe peeling, consider partial panel replacement
In many cases, a quick fix prevents more expensive damage down the line. Maintaining vigilance and dealing with small issues proactively ensures your sofa remains in top condition.
18. Safety Precautions and Best Practices
Furniture repair involves various tools and materials that can pose risks if used improperly. Prioritizing safety not only protects you but also ensures you don’t inadvertently damage your sofa or home.
18.1 General Safety Tips
- Wear Protective Gear: Gloves, safety glasses, and a dust mask when cutting foam or working with wood.
- Organize Your Workspace: Keep tools in designated spots, clear away tripping hazards.
- Ventilation: Use adhesives, paints, or stains in a well-ventilated area to avoid inhaling fumes.
18.2 Tool-Specific Precautions
- Staple Gun: Always engage safety locks. Keep fingers away from the trigger unless you’re ready to staple.
- Power Drill: Secure your piece; a slipping drill bit can cause injury or damage.
- Utility Knife: Always cut away from your body, keep blades sharp (dull blades are more prone to slipping).
18.3 Fire and Chemical Safety
- No Open Flames: Many upholstery materials are flammable; keep heat sources away from flammable adhesives or foam.
- Proper Disposal: Rags soaked in stain or solvent can spontaneously combust. Store them in airtight metal containers or soak them in water before disposal.
- Label Reading: Follow instructions on glues, dyes, or paint thinners diligently.
18.4 Furniture Movement and Handling
- Team Lift: Sofas can be heavy and unwieldy; get help to avoid back injuries.
- Stabilize: If placing the sofa on saw horses or a table, ensure it’s securely balanced before applying force.
18.5 Child and Pet Safety
- Keep Tools Out of Reach: Store them in locked cabinets or high shelves.
- Secure Work Area: If you have to leave the project mid-way, remove or unplug any dangerous tools.
Adhering to these best practices and precautions lets you complete your sofa repair projects without accidents, preserving both your well-being and your living space.
19. Case Studies: Real-Life Sofa Repair Examples
Nothing illustrates the power of sofa repair better than real-world examples. Below are a few scenarios showcasing how different approaches and techniques lead to successful outcomes.
19.1 Antique Family Heirloom Restoration
- Initial Condition: A century-old loveseat with a cracked wooden frame, threadbare velvet fabric, and missing tufting buttons.
- Repair Approach:
- Frame Repair: Reinforced joints with dowels and wood glue; replaced a broken leg.
- Reupholstery: Chose high-quality velvet in a deep burgundy hue, tufted to replicate the original design.
- New Cushions: High-density foam plus batting for a more modern comfort level.
- Outcome: The restored loveseat became a statement piece that honored its vintage character while offering renewed comfort.
19.2 Modern Sectional with Sagging Cushions
- Initial Condition: Two-year-old sectional had cushions that flattened in high-traffic spots, leaving a lumpy appearance.
- Repair Approach:
- Foam Replacement: Upgraded to a higher density foam.
- Re-Webbing: Under-cushion webbing was reinforced with stronger, thicker straps.
- Fabric Cleaning: Professionally steam-cleaned the entire sectional.
- Outcome: The sectional regained its shape and supportive feel, extending its life by several years without the need for reupholstery.
19.3 Leather Recliner Tear
- Initial Condition: A high-end leather recliner had a six-inch tear in the seat, courtesy of a pet’s enthusiastic scratching.
- Repair Approach:
- Surface Prep: Cleaned and sanded edges of the tear.
- Leather Patch: Inserted a backing patch and applied leather filler.
- Color Matching: Used a repair kit’s colorant to blend the patch seamlessly.
- Sealing and Conditioning: Final sealant layer, plus thorough conditioning to restore shine.
- Outcome: The tear became virtually invisible, preserving an expensive recliner that might otherwise have been discarded.
19.4 College Student’s Budget-Friendly Fix
- Initial Condition: A thrift-store find with torn cushions, minor frame wobble, and outdated floral fabric.
- Repair Approach:
- Frame Stabilization: Tightened screws and used brackets for extra support.
- DIY Slipcover: Instead of a full reupholstery, used a stretched slipcover to hide the old fabric.
- Throw Pillows: Added bright, modern pillows for style and comfort.
- Outcome: With minimal investment, the sofa looked appealing and functional, perfect for a budget-conscious student apartment.
These case studies highlight the flexibility of sofa repair solutions—ranging from quick cosmetic fixes to detailed restorations. Whether you tackle the project yourself or hire pros, practical methods exist for every style, budget, and sofa condition.
20. Frequently Asked Questions (FAQ)
20.1 Is sofa repair always cheaper than buying a new sofa?
In most cases, yes. However, if the sofa has severe structural damage and is a low-quality piece, replacing it might be more cost-effective. Perform a cost comparison or consult a professional to be sure.
20.2 How do I know if my sofa frame is worth repairing?
If the frame is hardwood (oak, maple, etc.) and generally stable, it’s usually worth repairing. Very cheap frames made of particleboard or plastic may not hold up well after repairs.
20.3 Can I mix different foam densities for seat and back cushions?
Absolutely. Many people prefer a firmer seat cushion (higher density) and a softer back cushion (lower density) for comfort and support.
20.4 Do I need specialized fabric for sofa repair?
Using upholstery-grade fabric is recommended for durability. Lightweight fabrics may tear or wear out quickly. If you’re uncertain, consult a professional or fabric store for guidance.
20.5 How can I remove pet odors from my sofa cushions?
Enzyme cleaners specifically target organic odors like pet urine. Steam cleaning with an enzymatic solution can also help. In severe cases, replacing the foam might be necessary.
20.6 Should I reupholster my sofa or buy a slipcover?
Reupholstery is a long-term solution, whereas slipcovers are more temporary. If you love the sofa’s frame and shape and want a custom look, reupholster. If budget is limited, a slipcover is a quick fix.
20.7 How often should I condition my leather sofa?
Most experts recommend conditioning leather sofas every 6 to 12 months to keep the leather supple and prevent cracking. High-traffic sofas may need more frequent treatment.
20.8 Is it possible to change my sofa’s style (e.g., from tufted to smooth) during reupholstery?
Yes, reupholstery can significantly alter a sofa’s style. A skilled upholsterer can remove or add tufting, change cushion shapes, or modify arm styles. Costs and feasibility depend on the existing frame.
21. Conclusion
Sofa repair is more than a quick fix—it’s an opportunity to refresh your living space, preserve cherished memories, and engage in a sustainable practice that reduces waste. From diagnosing frame damage to choosing the perfect upholstery fabric, each step in the repair or reupholstery process can be deeply rewarding. Whether you’re a DIY novice looking to patch a small tear or a homeowner planning a full-scale professional restoration, the essential tools, techniques, and tips outlined here will guide you toward a comfortable, stylish, and long-lasting sofa.
By assessing the damage, selecting suitable materials, and investing in either your own elbow grease or professional expertise, you can transform a tired, worn-out couch into a centerpiece that brings renewed life to your home. Remember: every cushion replaced, every tear stitched, and every squeaking spring silenced contributes to a piece of furniture that’s truly your own—reflecting your taste, lifestyle, and values.
Thank you for reading this extensive guide on sofa repair. We hope it equips you with the confidence and knowledge you need to tackle your next sofa-related challenge. Whether it’s foam replacement or an entire upholstery overhaul, may your project be as satisfying as the well-earned rest you’ll enjoy on your rejuvenated sofa.